Search

Metallographic Preparation of Copper and Its Alloys

Copper is soft and ductile: easy to work with, yet prone to surface damage during preparation. Its unique combination of properties, especially its exceptional electrical and thermal conductivity, makes it the material of choice in applications such as electrical wiring, telecommunications, heat exchangers, and kitchenware. Copper also plays a crucial role in the energy transition, being indispensable in technologies like wind turbines, solar panels, and electric vehicles. Its warm, attractive appearance further makes it popular for decorative and functional items like handles, doorknobs, countertops, and tables.

To accurately assess the microstructure of copper, careful metallographic preparation is essential, as improper handling can easily introduce artifacts like smearing or scratches caused by oxide pull-out. This guide walks you through each step in the metallographic preparation of copper and its alloys, from cutting and mounting to grinding, polishing, and etching.

Temi

  • Overview
  • Metallographic preparation of copper
    • Cutting and mounting
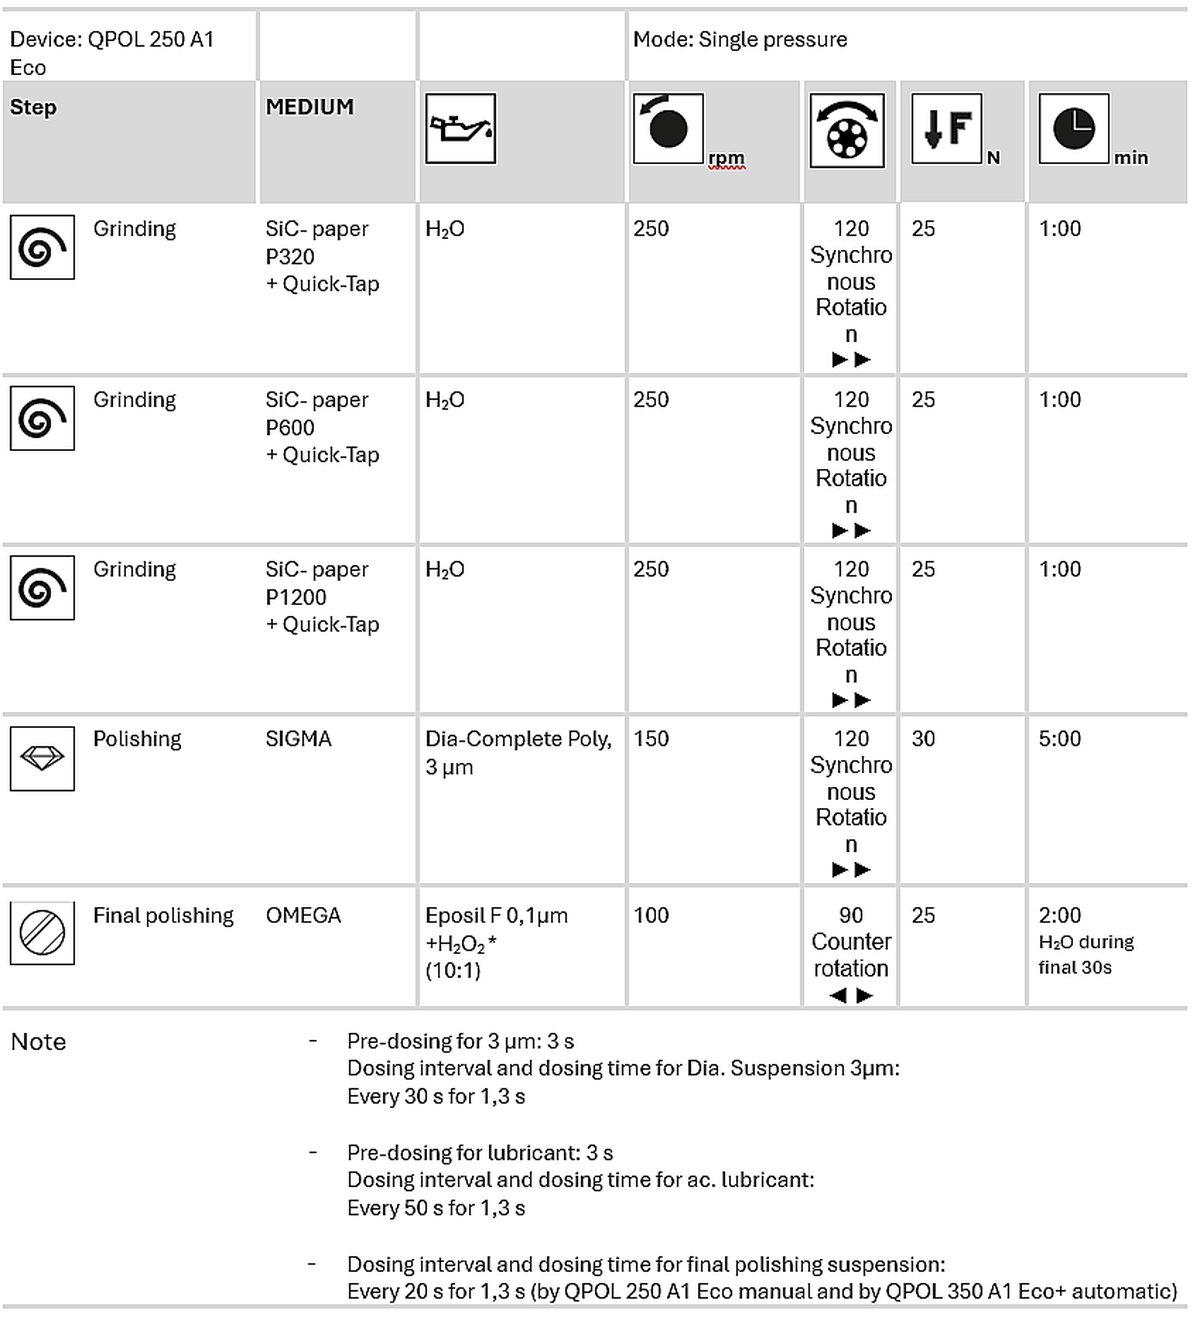
    • Grinding and polishing
    • Etching
  • FAQ
Preparazione di materiali trattati termicamente

QATM offre prodotti per tutte le applicazioni di materialografia

Panoramica

Copper is a reddish, highly ductile metal with a face-centred cubic (FCC) crystal structure, known for its excellent toughness and formability. It has been used by humans for thousands of years, not only because of its natural abundance but also due to its unique combination of properties. From a metallographic perspective, copper’s microstructure requires careful preparation to reveal details such as grain size, twinning, and oxide inclusions. Accurate microstructural analysis is essential for assessing the performance of both pure copper and copper alloys.

Copper is often alloyed with various elements to enhance specific mechanical, chemical, or physical properties. Common alloying elements and their functions include:

  • Zinc (brass) – provides improved strength and excellent machinability, making it ideal for fittings and mechanical components.
  • Tin (bronze) – enhances corrosion resistance and wear performance, commonly used in bearings and marine hardware.
  • Nickel (copper-nickel alloys) – increases resistance to seawater corrosion and chemical attack, suitable for marine and heat exchanger applications.
  • Aluminium, silicon, and other elements – are added to optimize strength, oxidation resistance, and chemical stability for specialized uses.

Copper alloys are generally classified into two main types. Wrought alloys are mechanically processed through methods such as rolling, extrusion, or drawing to achieve the desired shape. Cast alloys, on the other hand, are shaped directly from the liquid phase, making them ideal for producing complex geometries or large components.

Metallographic Preparation of Copper and Its Alloys

Cutting and Mounting of Cu and Cu-alloys


Copper and its alloys are relatively soft and ductile materials, which allows for easy sectioning—but also increases the risk of smearing, deformation, and thermal damage if the cutting process is not properly controlled. The cutting method must therefore be carefully adapted to the material type and geometry:

  • Pure copper is especially prone to smearing and surface deformation during sectioning. To minimize these effects, use a resin-bonded silicon carbide (SiC) cut-off wheel. For normal and floor-standing cut-off machines we recommend using our NF-A cut-off wheel, which is ideally suited for soft, non-ferrous metals with hardness values up to 300 HV, ensuring clean and low-distortion cuts.
  • Copper alloys, such as brasses, bronzes, or Cu-Ni systems, can generally be cut using the same parameters as pure copper. However, their slightly higher hardness and reduced ductility mean they often tolerate higher feed rates or mechanical loads without compromising cut quality.

To ensure precise and damage-free sectioning, it is essential to use a precision cut-off machine with sufficient coolant flow. Low cutting speed is recommended to reduce thermal effects and smearing. The sample must be clamped securely but gently to prevent vibration or distortion, especially for thin-walled or tubular specimens, which may deform due to internal stresses when cut longitudinally. For extreme thin and pressure sensitive samples like copper tubes or ammunition we recommend mounting the sample before clamping and sectioning.

Careful cutting is a critical first step in metallographic preparation and ensures that subsequent grinding and polishing can reveal the true microstructure without interference from preparation artifacts. For this reason, wet cutting with precise cut-off machines is the best method for cutting copper samples with minimal deformation.

Cutting a cable with copper wires in it in QCUT 150 A

Cutting a cable with copper wires in it in QCUT 150 A

Cutting a copper profile in QCUT 250 A with NF-A cut-off wheel

Cutting a copper profile in QCUT 250 A with NF-A cut-off wheel

Mounting provides mechanical support during grinding and polishing and is particularly important for small, irregular, or edge-sensitive copper specimens. It ensures stable handling, protects the sample edges, and improves preparation consistency.
The preferred mounting method for copper samples due to the low annealing temperature of these samples, is cold mounting but hot mounting is also possible.
For hot mounting, we recommend using Bakelite, available in red, black, or green, for routine applications. If transparent preparation is desired (e.g., for target preparation) using THERMOPLAST is an alternative. Here the heating temperature should be below 190°C.

Cold mounting is recommended when thermal exposure must be avoided, such as in failure analysis, heat or pressure-sensitive structures, or the preparation of complex geometries. Commonly used systems include the PMMA-based resins KEM 20 and KEM 30, as well as the epoxy resin Qpox 93, which provides excellent edge retention and minimal shrinkage.

Grinding and Polishing of Cu and Cu-alloys

Proper grinding and polishing are essential for accurately revealing the microstructure of copper and its alloys. Due to copper's softness and ductility, preparation must be carefully controlled to avoid smearing, edge rounding, or surface deformation that can obscure grain boundaries or fine structural details.

The goal is to produce a flat, scratch-free, and deformation-free surface that preserves both the metallic matrix and features such as grain structure, twin boundaries, and solder or weld zones. Because copper tends to deform plastically under mechanical stress, the grinding process must be adapted accordingly.

To prevent excessive deformation during grinding, it is generally recommended to begin planar grinding with the finest practical grit size, rather than starting with coarse abrasives. This reduces the depth of surface damage and simplifies subsequent polishing steps. For grinding of copper, we recommend using silicon carbide (SiC) grinding paper, which enables controlled material removal while minimizing smearing and mechanical distortion. We recommend using DiaComplete Poly, a water-based mixture of diamond suspension and lubricant designed for fast, efficient, and reproducible polishing.

A recommended preparation sequence for copper

* Use 98-90 % Eposil F + 2-10 % H₂O₂ for the final polishing step. Without additives, polishing time should be doubled.

Copper sample after fine polishing on the edge – 100:1

Copper sample after fine polishing on the edge – 100:1

A weld seam on a copper plate after final polishing – 200:1

A weld seam on a copper plate after final polishing – 200:1

A copper cross sectional sample after final polishing – 25:1

A copper cross sectional sample after final polishing – 25:1

Etching of Cu and Cu-alloys

Etching is an essential step in the metallographic preparation of copper and its alloys. It allows microstructural features such as grain boundaries, twins, and second-phase particles to become visible under the microscope. In many cases, especially with cast alloys, etching is straightforward. However, finding the optimal etchant can be more challenging for wrought copper alloys, particularly those that have undergone extensive cold deformation. In such cases, colour etching can offer additional contrast and clarity.

Common etchants can be prepared in the laboratory using standard chemical reagents. The following table summarizes typical formulations and usage conditions:

Safety Notice: Acids must be used with caution. Wear protective equipment and follow lab safety guidelines.

Composition Etching Conditions Description
120 ml distilled water or ethanol (≥96%) , 10 g iron-(III)-chloride 1–3 minutes Visualization of the macrostructure, formation of dendrites in alpha alloys, all types of brass and Al-bronzes; grain surface etching
50 ml distilled water
50 ml nitric acid (65%)
10 – 120 seconds Visualization of the macrostructure; Grain surface etching; Etching of brass
100 ml distilled water, 10 g ammonium persulfate 10 seconds to 2 minutes; May be gently heated to intensify reaction Visualization of the microstructure (e.g.,grain boundaries and grain surfaces)
100–120 ml distilled water, 20–50 ml hydrochloric acid (32%), 5–10 g iron-(III)-chloride 10–60 seconds Etches beta phase in brass. Etching of bonze and brass.

Note: If the sample contains lead, most etchants will attack the inclusions, leaving black voids. For accurate documentation of lead distribution, images should be taken before etching.

Copper cross sectional sample after etching with Copper A iron chloride etchant – 25:1

Copper cross sectional sample after etching with Copper A iron chloride etchant – 25:1

The contact area between two copper plates after etching – 200:1

The contact area between two copper plates after etching – 200:1

The heat affected zone in a laser welded copper sample – 100:1

The heat affected zone in a laser welded copper sample – 100:1

Copper alloy after etching with Ferritic nitrate CU2 etchant – 100:1

Copper alloy after etching with Ferritic nitrate CU2 etchant – 100:1

Hardness testing of Cu and Cu alloys

Hardness testing of copper and its alloys is commonly performed using Vickers (HV), Brinell (HB), or Rockwell (HR) methods. Typical hardness values of high-purity copper range from 40 to 150 HV, while copper alloys can reach 300 HV or more. These values depend on composition, heat treatment, and degree of cold work, making hardness testing an important quality control tool. For more information about hardness testing, consult our knowledge base, where you can find detailed guidance on materialographic sample preparation and characterization.

Hardness testing of Cu and Cu alloys

Need more information?

If you have any further inquiries, don’t hesitate to reach out via our contact form. We’re always happy to assist you in finding the best solution for your metallographic sample preparation needs.

We supply you with the best instruments for your application needs

FAQ- Metallographic Preparation of Copper and Its Alloys

Why does copper require special care during metallographic preparation?

Copper is soft and ductile, making it prone to smearing and surface deformation. Its high thermal conductivity also complicates heat control during cutting. These factors demand precise, low-force preparation methods to avoid masking microstructural details.

What makes copper alloys different from pure copper in metallography?

Copper alloys are generally harder and may contain multiple phases or grain structures. For example, brass and bronze require etchants that highlight phase differences. Some alloys also etch non-uniformly or exhibit selective corrosion.

How can smearing be minimized during grinding and polishing?

Use fresh, sharp abrasives with low to moderate pressure. Avoid long polishing cycles. Clean between each step and ensure consistent lubricant dosing to prevent dragging of soft metal across the surface.

What is the best way to reveal grain structure in copper?

Polish to a mirror finish followed by brief etching with ferric chloride or ammonium persulfate solution. Adjust the etching time carefully and observe under brightfield illumination for grain contrast

Which cut-off wheel is the right choice for sectioning of copper?

For optimal results when sectioning copper, we recommend using a resin-bonded silicon carbide (SiC) wheel, such as the QATM NF-A cut-off wheel. Specifically designed for soft, non-ferrous metals with hardness values up to 300 HV, the NF-A minimizes smearing and surface deformation - common issues when working with copper due to its softness.

Can copper samples corrode during preparation?

Copper is reactive and can corrode if left wet or exposed to air. Always rinse with ethanol after final polishing and dry with warm air. Use water-free lubricants when possible.

After final polishing, scratches from the 3 micrometer step are still visible. What can I do?

Ensure that all polishing cloths are thoroughly cleaned using a clean brush under running water to remove any residual abrasive particles. Also rinse the specimens and the sample holder. Then repeat the final polishing step. This helps prevent contamination and improves the final surface quality.

Which grinding and polishing machines are suitable for the preparation of copper and its alloys?

Due to its softness, copper and its alloys can be challenging to prepare manually. Manual preparation often leads to issues such as sample slanting or uneven material removal, which can compromise the quality of the results. To ensure consistent, flat surfaces and reproducible outcomes, we recommend using (semi-)automatic grinding and polishing machines, such as the QATM Qpol or Saphir series.

QATM Prodotti & Contatto

QATM offre un'ampia gamma di strumenti innovativi e robusti per la materialografia, la metallografia e la prova di durezza. I nostri esperti conoscono i requisiti di ogni settore industriale e saranno lieti di aiutarvi a trovare la soluzione giusta per la vostra applicazione.