Stainless steel is a corrosion-resistant iron-based alloy family defined by a high chromium content, typically above 12%, which enables the formation of a thin, self-healing passive oxide layer. This protective film shields the underlying material from environmental attack, making stainless steels exceptionally durable in harsh or corrosive environments. In contrast to standard carbon or low-alloy steels, which are more reactive and easier to etch, stainless steels are specifically designed to resist chemical attack. This makes their metallographic preparation more demanding and requires carefully optimized methods.
Topics
From everyday essentials like cookware or kitchen sinks to demanding environments such as chemical plants, hospitals, and construction sites, stainless steel plays a vital role thanks to its strength and corrosion resistance. From a metallurgical perspective, stainless steels are classified based on their microstructure at room temperature:
Each stainless steel type presents its own challenges during metallographic preparation. Ferritic stainless steels, being relatively soft, are prone to scratching and edge rounding, while austenitic stainless steels, due to their high ductility, often suffer from plastic deformation and smearing during grinding and polishing. If not properly controlled, these preparation artifacts can obscure key microstructural features and compromise the accuracy of the analysis.
The following sections provide a detailed, step-by-step guide to the metallographic preparation of stainless steel, starting from cutting and mounting to grinding, polishing, and etching. The following will help you achieve clear, reproducible, and artifact-free results across all stainless steel grades.
Sectioning is the first step in the metallographic preparation of stainless steel and must be performed with care to prevent structural damage or deformation. Choosing the correct cut-off wheel is critical, to avoid sample burn or smearing and to ensure long service life and reliable performance of the cut-off wheel. For ferrous materials, a resin-bonded alumina wheel is generally recommended, e.g., our FS-series, which offers optimized performance across a broad hardness range, from soft steels (>HV 50) to very hard grades (>HV 700).
To minimize thermal damage and deformation during cutting, use a low, constant feed rate (typically around 0.1–0.25 mm/s), ensure the sample is securely clamped, and maintain adequate coolant flow to dissipate heat and flush away debris. Selecting the right combination of wheel and cutting parameters helps produce a smooth, undistorted surface that eases subsequent grinding and polishing.
In the next step, mounting the stainless steel specimen provides mechanical support, protects the edges, and ensures easier handling during the grinding and polishing steps. Both hot mounting and cold mounting methods are suitable, depending on the sample type, size, and application.
For hot mounting a thermosetting resin like Bakelite offers a fast and economical solution with good overall durability for routine mountings of soft to medium hard steels. For harder stainless steels or when edge retention is critical mounting resins with superior performance, such as EPO BLACK or EPO-MAX, are recommended. These offer excellent hardness, low shrinkage, and strong edge definition, making them ideal for critical metallographic work.
If the sample is heat-sensitive, has a complex geometry, or contains features that must not be exposed to high pressure or temperature, cold mounting is the preferred option. For medium-hard to hard stainless steels, a low-shrinkage, high-performance cold mounting resin like KEM 15 PLUS is ideal. It cures at temperatures below 100 °C and provides high edge retention with minimal shrinkage, ensuring that even delicate edges and microstructures are preserved during preparation.
Stainless steels exhibit different behaviour during grinding and polishing depending on their microstructure. Ferritic and austenitic steels, being soft or ductile, are particularly susceptible to mechanical deformation. In contrast, martensitic stainless steels are generally easier to polish due to their high hardness but require care to sustain the integrity of carbides.
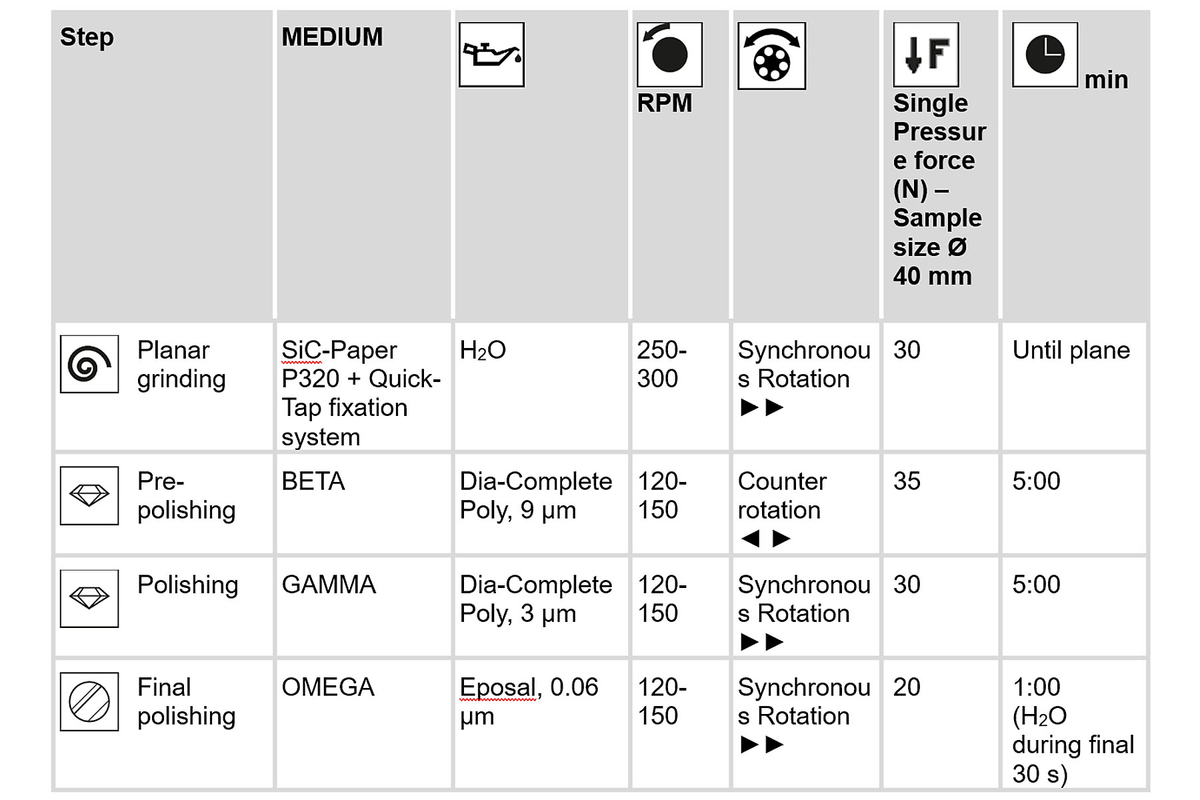
To minimize deformation during grinding, especially with soft or ductile steels, avoid coarse abrasives and applying excessive pressure. Instead, opt for SiC paper or foil with a finer grit size, combined with moderate force.
For polishing, a (medium) hard cloth paired with a diamond suspension (e.g., Dia Complete Poly ensures effective material removal and surface refinement. To achieve the highest surface quality, a final polishing step using an alumina suspension (e.g., Eposal is recommended. After each preparation step, inspect the sample under the microscope to verify that polishing marks are uniform in size and randomly oriented. This indicates consistent material removal and prevents directional artifacts in the final image.
A suggested preparation method for stainless steel samples is provided in the table on the right.
Etching is the final step that makes the microstructural features (e.g., different phases) of stainless steel visible under the microscope. After polishing, the stainless steel surface is featureless and mirror-like. During the etch a chemical or electrochemical action attacks the steel selectively, revealing grain boundaries, phases, and other microstructural details. Because stainless steels are specifically designed to resist chemical attack, relatively strong etchants and proper technique are required to achieve reliable contrast. Some of the most common etchants for stainless steel can be found in the following table:
Safety Notice: Acids must be used with caution. Wear protective equipment and follow lab safety guidelines.
| Compositie | Voorwaarden voor het etsen | Omschrijving |
| V2A etchant: 100 ml distilled water 100 ml hydrochloric acid 32% 10 ml nitric acid 65% 0.3 ml Vogel’s economy etchant |
5 to 120 seconds at room temperature or up to 70°C | Etchant for visualizing the microstructure of austenitic high-alloy Cr and CrNi steels, Sigma-Phase and ferrite. | Kalling I 33 ml distilled water 33 ml ethanol min. 96% 33 ml hydrochloric acid 32% 1.5 g copper(II) chloride |
5 to 120 seconds | Etchant for visualizing the microstructure of martensitic stainless steels. Martensite is etched dark, ferrite is coloured, austenite remains white. | Kalling II 100 ml distilled water 100 ml hydrochloric acid 32% 5 g copper(II) chloride |
5 to 120 seconds | Etchant for visualizing the microstructure of stainless steels. Ferrite is etched very quickly; carbides are not etched and austenite just slightly. |
| Lichtenegger and Bloech 100 ml distilled water 20 g ammonium hydrogen fluoride 0.5 g potassium disulphite |
5 to 120 seconds Surface is immersed wet in the etching solution |
Etchant for visualizing the microstructure of high-alloyed Cr and CrNi steels; austenite is coloured, delta ferrite remains white. Suitable for duplex steel | Adler 25 ml distilled water 10 g diammonium tetrachlorocuprate (II) After dissolving, add: 50 ml hydrochloric acid 32% 15 g iron(III) chloride |
10 to 60 seconds | Visualization of macrostructure and of welded joints. |
Stainless steel requires more tailored preparation sequences than standard steels due to its high alloy content and corrosion resistance. Its ductility (in austenitic grades) makes it prone to smearing and deformation, while harder grades (like martensitic) may contain carbides that must be preserved. Additionally, etching stainless steel is more challenging because it resists chemical attacks. Stronger etchants and longer etching times are usually needed to reveal the microstructure clearly. In contrast, standard steels typically require less aggressive techniques and etch more easily.
For sectioning stainless steel, a resin-bonded alumina cut-off wheel is typically recommended. We recommend the FS-series, which is specifically developed for the cutting of steels and offers wheels tailored to different hardness levels. Selecting the appropriate wheel based on the material hardness ensures optimal cutting quality and tool life. For optimal results, combine the right cut-off wheel with a low, steady feed rate and adequate coolant flow.
The choice between hot and cold mounting depends on the type and condition of your sample. Hot mounting with thermosetting resins is suitable for routine preparation of medium-hard stainless steels. Bakelite is an economical option for general-purpose use. For harder stainless steels and when edge retention is critical, EPO-BLACK and EPO-MAX are recommended for their excellent hardness, low shrinkage, and good edge definition. If the specimen is heat-sensitive or has a complex geometry, cold mounting is the method of choice. A low-shrinkage resin like KEM 15 PLUS provides excellent edge retention and reduces thermal stress and external pressure during curing, making it ideal for preserving fine microstructural details.
Relief marks are usually a sign of overpolishing, where softer matrix material is removed faster than harder phases, creating uneven surface topography. To address this issue, repeat the GAMMA (3 µm) and OMEGA (final) polishing steps with shorter polishing times. Also, check your machine settings. Relief can occur if the final polishing step was not performed with counter-rotation. Repeating the 3 µm and final step with the correct settings should restore a flat, artifact-free surface.
The choice depends on the type of steel:
Austenitic steels: V2A etchant
Martensitic steels: Kalling I
Duplex steels: Lichtenegger and Bloech
These etchants are designed to selectively attack specific phases in each alloy type, revealing features such as grain boundaries, ferrite content, or carbide distribution. All listed etchants are available in our consumables webshop.
Etching is essential for revealing microstructural features such as grain boundaries, phases, and carbides. After polishing, stainless steel surfaces appear mirror-like and mostly featureless under the microscope. To create contrast, the surface needs a slight topography that interacts with light, which is achieved by the selective chemical attack by the etchant. Different constituents in the microstructure react differently to specific etchants, allowing various phases to appear with distinct contrast. Without etching, key structural details remain hidden, making accurate metallographic evaluation impossible.
Proper cleaning between preparation steps is essential to avoid cross-contamination, surface staining, and preparation artifacts. After each grinding and polishing step, the samples, sample holders, and hands should be thoroughly rinsed under running water to remove abrasive particles from the previous step. This prevents coarse abrasives from being carried over into the next, finer preparation stage. To avoid water stains, rinse the samples with ethanol and dry them using a blow dryer or warm air. Consistent cleaning throughout the preparation process helps maintain surface integrity and improves the reliability of the results.
If you have any further inquiries, don’t hesitate to reach out via our contact form. We’re always happy to assist you in finding the best solution for your metallographic sample preparation needs.
QATM offers a wide range of innovative and robust instruments for materialography, metallography and hardness testing. Our experts know the requirements of each branch of industry and and will be happy to assist in finding the right solution for your application.